今回は2022年8月に公開された、高性能画像生成モデルである「Stable Diffusion」を実装する方法を紹介します。
第2回目は「img2img」により、画像と任意のキーワードを組み合わせて、様々な画像を生成して遊んでみましょう。
Google colabを使用して簡単に実装することができますので、ぜひ最後までご覧ください。
今回の目標
・Stable Diffusionとは
・Stable Diffusionの導入方法
・Stable Diffusionの実装(img2img)
Stable Diffusionとは
Stable Diffusionは拡散モデルによる画像生成モデルで、スタートアップ企業であるStability AIが2022年8月に「Stable Diffusion」と、それを使用したサービス「DreamStudio」のβ版をリリースしました。
Stable Diffusionは、SNSなどで話題になっている「Midjourney」と同様で、テキストから画像を生成することができます。
無料で公開されており、商用利用も可能なライセンスの下でリリースされているため、様々なシーンでの活用が期待されます。
Latent Diffusionをベースとしており、非常に大規模なデータセットであるLAION-5Bを用いてトレーニングされています。
参考URL:https://huggingface.co/blog/stable_diffusion
Stable Diffusionの導入
Hugging Faceの登録とNewTokenの発行
Hugging Faceのアカウント作成
初めにHuggingFaceのアカウントを作成します。
※Hugging Faceとは米国のHugging Face社が提供している、自然言語処理に特化したディープラーニングのフレームワークです。
ソースコードは全てGitHub上で公開されており、誰でも無料で使うことができます。
HuggingFaceにアクセスし、画面右上のSignUpよりアカウントを作成することができます。
登録したメールアドレスに認証メールが届くので、メールに記載されたリンクにアクセスすれば、アカウント登録は完了です。
Access Repositoryの承諾
こちらのCompVis/stable-diffusion-v1-4にアクセスし記載の内容を確認の上、「Access Repository」をクリックすることで権限を得ることができます。
この時点で、モデルの作者にメールアドレスとユーザー名が共有されることになりますので注意してください。
モデルの使用にあたっては、意図的に違法または有害な出力やコンテンツを作成・共有することが禁止されています。
CreativeML OpenRAIL Licenseに準拠した上で、再配布や商用利用のルールなどについての記載に同意する必要があります。
Access Tokensの発行
画面右上のアカウントのアイコンから[Settings]->[Access Tokens]に移動しNewTokenを発行します。
後ほど使用しますので、メモしておきましょう。
Google colabの準備
ここからは、Google colab環境で進めていきます。
まずはGPUを使用できるように設定をします。
「ランタイムのタイプを変更」→「ハードウェアアクセラレータ」をGPUに変更
今回紹介するコードは以下のボタンからコピーして使用していただくことも可能です。
まずはgoogleドライブをマウントします。
次に今回作成した画像を保存するフォルダを作成します。
フォルダ名は変えても問題ありありません。
from google.colab import drive
drive.mount('/content/drive')

#保存フォルダを作成する
 !mkdir -p '/content/drive/My Drive/Stable Diffusion_main/'
%cd '/content/drive/My Drive/Stable Diffusion_main/'
以上で導入が完了しました。
Stable Diffusionの実装(img2img)
ここからはStable Diffusionによる「img2img」を実装していきます。
なお、前回の記事では「txt2img」を紹介しております。
よろしければ合わせてご覧ください。
準備
まずはhuggingfaceから今回使用するリポジトリをクローンします。
!git clone https://github.com/huggingface/diffusers.git次に必要なライブラリをインストールします。
%cd diffusers
!pip install diffusers transformers scipy ftfy
次にモデルをダウンロードしましょう。
ここで先程取得した、Access Tokensが必要となります。
import matplotlib.pyplot as plt
from PIL import Image

import torch
from torch import autocast

%cd ./examples/inference

from image_to_image import StableDiffusionImg2ImgPipeline,preprocess

%cd '/content/drive/My Drive/Stable Diffusion_main/diffusers'

# ここに先程取得したAccess Tokensを貼り付ける
access_tokens="ここにAccess Tokensを貼り付け"

device = "cuda"
pipe = StableDiffusionImg2ImgPipeline.from_pretrained(
    "CompVis/stable-diffusion-v1-4",
    revision="fp16",
    torch_dtype=torch.float16,
    use_auth_token=access_tokens
).to(device)
入力画像
まずは生成したい画像の元となる画像を用意しましょう。
今回はいらすとやさんからこの画像をお借りいたします。
画像が用意できたら、以下の場所に保管します。
filename = 'food_sushi_funamori.png'

'''

#画像の保管場所
Stable Diffusion_main/
  ┗ diffusers
     ┠ food_sushi_funamori.png
'''
画像サイズをリサイズします。
合わせて、pngファイルはjpgファイルに変換します。
init_image = Image.open(filename)
if '.png' in filename:
  init_image = init_image.convert('RGB')
resize_image = init_image.resize((768, 512))
input_img = preprocess(resize_image)
ここまで来たら、入力画像を表示してましょう。
plt.imshow(resize_image)
plt.axis('off')
plt.show()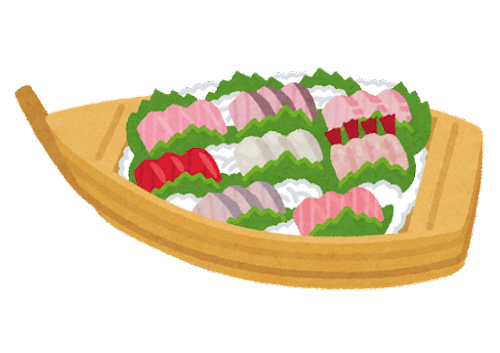
画像生成
「prompt =」以降に、変換したい対象、条件などを記述して画像生成を実行しましょう。
例として、「a photo of」とすることで、イラスト風の画像から写真のような画像が出来上がります。
「strength=」は元の画像に対してどの程度変化を加えるかを設定するパラメータです。
0~1の間で、1に近いほど、元の画像からの変化量が大きくなります。
以下の例では0.7としていますので、やや元の画像から変化が大きいと言えます。
prompt = "a photo of,sashimi,funamori"

generator = torch.Generator(device).manual_seed(12)

with autocast("cuda"):
  images = pipe(
      prompt=prompt, init_image=input_img,
      strength=0.7, guidance_scale=7.5,
      num_inference_steps=51, generator=generator,)["sample"]

images[0].save("result.png")

# 結果を表示
plt.imshow(plt.imread("result.png")
plt.axis('off')
plt.show()
出力結果の画像は以下のようなりました。
今回の例では、strengthの値を大きくするほど、実写版に近づいていることがわかります。
まとめ
以上をまとめると、以下のようになります。
入力する画像とキーワードを変えて、画像を生成をお楽しみください。
# 作業フォルダを作成

from google.colab import drive
drive.mount('/content/drive')
!mkdir -p '/content/drive/My Drive/Stable Diffusion_main/'
%cd '/content/drive/My Drive/Stable Diffusion_main/'

# クローン
!git clone https://github.com/huggingface/diffusers.git

# インストール
%cd diffusers
!pip install diffusers transformers scipy ftfy

import matplotlib.pyplot as plt
from PIL import Image
import torch
from torch import autocast

%cd ./examples/inference

from image_to_image import StableDiffusionImg2ImgPipeline,preprocess

%cd '/content/drive/My Drive/Stable Diffusion_main/diffusers'

# モデルをダウンロード
access_tokens="ここにAccess Tokensを貼り付け"
device = "cuda"
pipe = StableDiffusionImg2ImgPipeline.from_pretrained(
    "CompVis/stable-diffusion-v1-4",
    revision="fp16",
    torch_dtype=torch.float16,
    use_auth_token=access_tokens
).to(device)

# 入力画像を読み込み
filename = 'food_sushi_funamori.png'
init_image = Image.open(filename)
if '.png' in filename:
  init_image = init_image.convert('RGB')
resize_image = init_image.resize((768, 512))
input_img = preprocess(resize_image)

# 入力画像を表示
plt.imshow(resize_image)
plt.axis('off')
plt.show()

# キーワードを指定
prompt = "a photo of,sashimi,funamori"

# 画像生成
generator = torch.Generator(device).manual_seed(12)

with autocast("cuda"):
  images = pipe(
      prompt=prompt, init_image=input_img,
      strength=0.7, guidance_scale=7.5,
      num_inference_steps=51, generator=generator,)["sample"]

# 結果を保存
images[0].save("result.png")

# 結果を表示
plt.imshow(plt.imread("result.png")
plt.axis('off')
plt.show()
生成した画像の紹介
いくつかの例を紹介します。
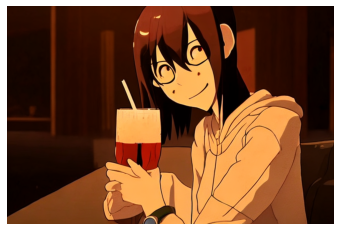
例1
prompt = "cartoon,Kawaii girl,drink,by Makoto Shinkai"

generator = torch.Generator(device).manual_seed(12)

with autocast("cuda"):
  images = pipe(
      prompt=prompt, init_image=input_img,
      strength=0.8, guidance_scale=7.5,
      num_inference_steps=51, generator=generator,)["sample"]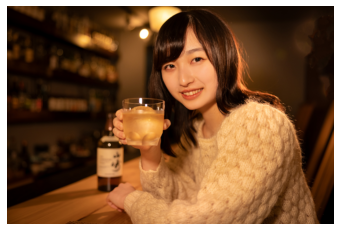
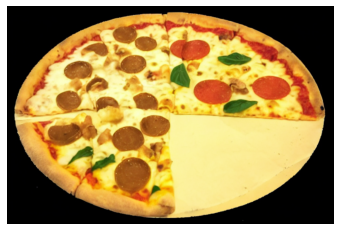
例2
prompt = "a photo of,pizza"

generator = torch.Generator(device).manual_seed(12)

with autocast("cuda"):
  images = pipe(
      prompt=prompt, init_image=input_img,
      strength=0.8, guidance_scale=7.5,
      num_inference_steps=51, generator=generator,)["sample"]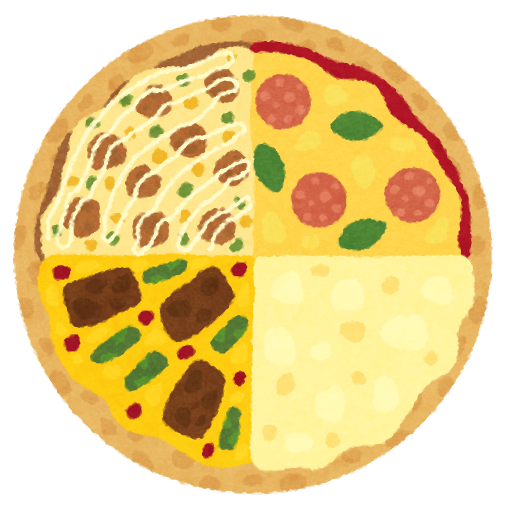
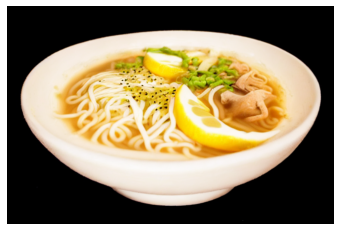
例3
prompt = "a photo of,lemon,ramen"

generator = torch.Generator(device).manual_seed(12)

with autocast("cuda"):
  images = pipe(
      prompt=prompt, init_image=input_img,
      strength=0.8, guidance_scale=7.5,
      num_inference_steps=51, generator=generator,)["sample"]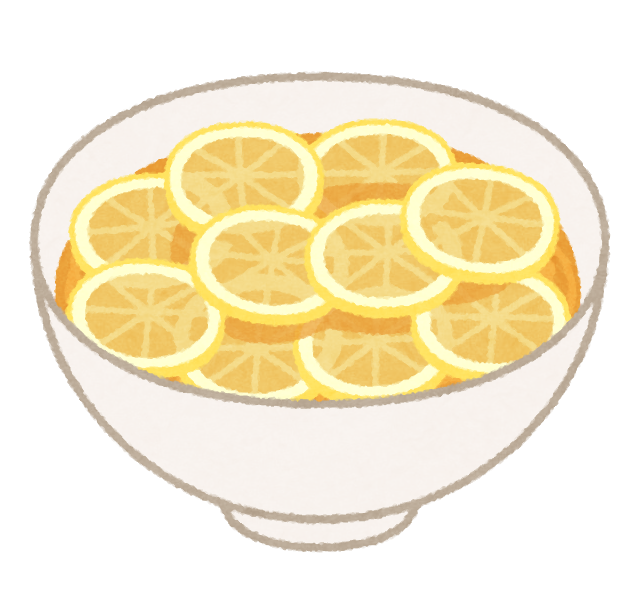
結果を動画にまとめました。
まとめ
最後までご覧いただきありがとうございました。
今回は2022年8月に公開された、高性能画像生成モデルである「Stable Diffusion」を実装する方法を紹介しました。
「img2img」により、画像と任意のキーワードを組み合わせて、様々な画像を生成して遊んでみました。
なお、作成した画像をより高解像度にする方法も別の記事で紹介しています。ぜひご覧ください。