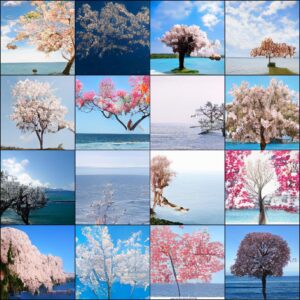
双方向トランスデコーダーを使用した新しい画像合成手法であるMaskGIT(マスクされた生成画像トランスフォーマー)を紹介します。
実際に画像生成を試してみましょう。
Google colabを使用して簡単に実装することができますので、ぜひ最後までご覧ください。
今回の目標
・MaskGITは
・MaskGITの実装(指定した単語から画像生成する)
・MaskGITの実装(画像の一部を指定した単語の画像に置き換える)
MaskGITは
MaskGITは双方向トランスデコーダを使用した新しい画像合成パラダイムです。
トレーニング中、MaskGITは、すべての方向のトークンに注意を払うことにより、ランダムにマスクされたトークンを予測することを学習します。
推論時に、モデルは画像のすべてのトークンを同時に生成することから始まり、次に前の世代で繰り返し条件付けられた画像を改良します。
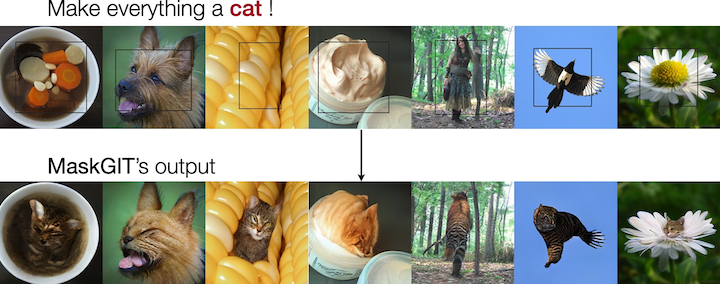
MaskGITによりImageNetデータセットの最先端のトランスフォーマーモデルを大幅に上回り、自己回帰デコードを最大64倍高速化しました。
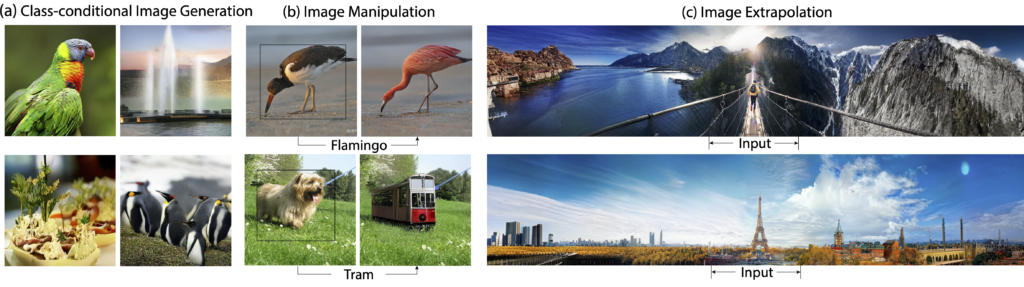
MaskGITは、修復、外挿、画像操作などのさまざまな画像編集タスクに拡張できます。
例えば下の画像のように、画像の一部分を指定した言葉の画像に変更(画像修復)することが可能です。
出典は以下の通りです。
MaskGITの導入
早速MaskGITを使用していきましょう。
以下、Google colab環境で進めていきます。
まずはGPUを使用できるように設定をします。
「ランタイムのタイプを変更」→「ハードウェアアクセラレータ」をGPUに変更
今回紹介するコードは以下のボタンからコピーして使用していただくことも可能です。
![]()
from google.colab import drive
drive.mount('/content/drive')
%cd ./drive/MyDrive
!pip install jax flax
!pip install numpy tensorflow matplotlib ml_collections公式よりcloneしてきます。
!git clone https://github.com/google-research/maskgit.git
%cd maskgit
以上で導入が完了しました。
指定した単語から画像生成する
準備
まずは必要なライブラリをインポートします。
import numpy as np
import jax
import jax.numpy as jnp
import os
import itertools
from timeit import default_timer as timer

import maskgit
from maskgit.utils import visualize_images, read_image_from_url, restore_from_path, draw_image_with_bbox, Bbox
from maskgit.inference import ImageNet_class_conditional_generator
次にモデルをダウンロードします。
!mkdir -p checkpoints/

models_to_download = itertools.product(
    *[ ["maskgit", "tokenizer"],   [256, 512] ])

for (type_, resolution) in models_to_download:
  canonical_path = ImageNet_class_conditional_generator.checkpoint_canonical_path(type_, resolution)
  if os.path.isfile(canonical_path):
    print(f"Checkpoint for {resolution} {type_} already exists, not downloading again")
  else:
    source_url = f'https://storage.googleapis.com/maskgit-public/checkpoints/{type_}_imagenet{resolution}_checkpoint'
    !wget {source_url} -O {canonical_path}
画像生成
いよいよ単語を指定して画像を生成してみます。
どのような単語を選択できるのかはこちらからご確認ください。
ここでは「category = "963) pizza, pizza pie"」を選択します。
generator_256 = ImageNet_class_conditional_generator(image_size=256)
generator_512 = ImageNet_class_conditional_generator(image_size=512)
arbitrary_seed = 42
rng = jax.random.PRNGKey(arbitrary_seed)

run_mode = 'normal'

p_generate_256_samples = generator_256.p_generate_samples()
p_edit_512_samples = generator_512.p_edit_samples()

category = "963) pizza, pizza pie"

label = int(category.split(')')[0])

input_tokens = generator_256.create_input_tokens_normal(label)
pmap_input_tokens = generator_256.pmap_input_tokens(input_tokens)
生成した画像を表示させてみましょう。
image_size = 256
rng, sample_rng = jax.random.split(rng)
start_timer = timer()

if run_mode == 'normal':
    results = generator_256.generate_samples(input_tokens, sample_rng)
elif run_mode == 'pmap':
    sample_rngs = jax.random.split(sample_rng, jax.local_device_count())
    results = p_generate_256_samples(pmap_input_tokens, sample_rngs)

    # flatten the pmap results
    results = results.reshape([-1, image_size, image_size, 3])

end_timer = timer()
print(f"generated {generator_256.eval_batch_size()} images in {end_timer - start_timer} seconds")

visualize_images(results, title=f'results')
美味しそうなピザの画像を生成することができました。
なお、単語を変えることで他の画像も生成することができます。
単語一覧(日本語)はこの記事の最後で紹介しています。
ぜひ色々な単語で試してみてくださいね。
結果を保存する
最後に結果を画像として保存しましょう。
import cv2
from keras.preprocessing.image import load_img,img_to_array
def save_images(images, title='', figsize=(30, 6)):
  batch_size, height, width, c = images.shape
  images = images.swapaxes(0, 1)
  image_grid = images.reshape(height, batch_size*width, c)
  image_grid = np.clip(image_grid, 0, 1)
  image_grid =jax.numpy.asarray(image_grid, dtype=None, order=None)
  temp_img_array = img_to_array(image_grid)*255
  temp_img_array = cv2.cvtColor(temp_img_array, cv2.COLOR_BGR2RGB)
  cv2.imwrite(str(label)+"_results.jpg", temp_img_array)

save_images(results, title=f'results')
画像の一部を指定した単語の画像に置き換える
次に画像の一部分を指定した単語に置き換えてみましょう。
以下のように画像の中の指定した範囲を指定した単語の画像に置き換えます。
サンプル画像を使用して、実装してみます。
まずは何に置き換えるのかを指定します。
ここでは「ポメラニアン」にします。
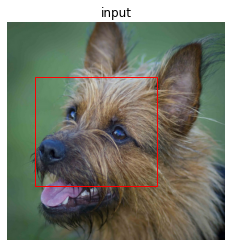
category = "259) Pomeranian"次に元画像に対して、置き換える範囲を指定しましょう。
bbox_top_left_height_widthによって枠線を設定できます。
# we switch to 512 here for demo purposes
image_size = 512
bbox_top_left_height_width = '128_64_256_288'
img_url = 'https://storage.googleapis.com/maskgit-public/imgs/class_cond_input_1.png'

bbox = Bbox(bbox_top_left_height_width)
image = read_image_from_url(
    img_url,
    height=image_size,
    width=image_size)

draw_image_with_bbox(image, bbox)

latent_mask, input_tokens = generator_512.create_latent_mask_and_input_tokens_for_image_editing(
    image, bbox, label)

pmap_input_tokens = generator_512.pmap_input_tokens(input_tokens)
元画像に対して以下の部分を先ほど指定した「ポメラニアン」に変更します。
rng, sample_rng = jax.random.split(rng)

if run_mode == 'normal':
    # starting from [2] to represent the fact that we
    # already know some tokens from the given image
    results = generator_512.generate_samples(
        input_tokens,
        sample_rng,
        start_iter=2,
        num_iterations=12
        )

elif run_mode == 'pmap':
    sample_rngs = jax.random.split(sample_rng, jax.local_device_count())
    results = p_edit_512_samples(pmap_input_tokens, sample_rngs)
    # flatten the pmap results
    results = results.reshape([-1, image_size, image_size, 3])

composite_images = generator_512.composite_outputs(image, latent_mask, results)

visualize_images(composite_images, title=f'outputs')
顔の部分がポメラニアンに変わりました。

まとめ
最後までご覧いただきありがとうございました。
今回はMaskGITの実装を紹介しました。
様々な画像の生成をしたり修復を試してみると楽しそうですね。
(組み合わせによってはグロイ画像になってしまうこともあるでご注意ください)